Sunday, September 30, 2012
BlogLovin
Happy beautiful Fall morning everyone! As I'm sitting here enjoying my Pumpkin Spice Latte, I stumbled upon this website, BlogLovin. It's a handy little place you can go to read all your favorite blogs in one location. Well, needless to say, Simply Settling In is now on BlogLovin. I would love it if you would join and follow me. More creative fall posts are coming soon and you don't want to miss them.

Thursday, September 27, 2012
Fall Decor- Lovin these Candles
I can't tell you how excited I am for fall! I think its the most beautiful season. I love the colors, the smells, the temperature, and all my favorite fall foods. With my obsession for fall, its safe to say I'm in full swing decorating the Harvey house.
Each season I change out the candles in the center of our kitchen table. I had three Apothecary type jars left from our wedding that were perfect for this project.
What You Need:
Jars (Apothecary, Mason, Hurricanes etc)
Candles
Yellow Corn Kernels
Red Beans
Split Peas
Raffia or Jute

These are so simple to make. All you need to do is put your candles down in the middle of the jars and layer the corn, beans, and peas around the candles . Tie a little raffia or jute around the jars and you now have the cutest fall candle holders. (I took my picture before I added the jute)
I loved these so much I had to make a set in some Mason jars I had to place on our mantle.

Each season I change out the candles in the center of our kitchen table. I had three Apothecary type jars left from our wedding that were perfect for this project.
What You Need:
Jars (Apothecary, Mason, Hurricanes etc)
Candles
Yellow Corn Kernels
Red Beans
Split Peas
Raffia or Jute

These are so simple to make. All you need to do is put your candles down in the middle of the jars and layer the corn, beans, and peas around the candles . Tie a little raffia or jute around the jars and you now have the cutest fall candle holders. (I took my picture before I added the jute)
I loved these so much I had to make a set in some Mason jars I had to place on our mantle.

Sunday, August 26, 2012
Brat Burgers- The Best of Both Worlds!
As a vegetarian, I don't cook meat very often at all. Nick, one of the biggest burger and bacon lovin' people I have ever met, has been a trooper through all my veggie dishes and meat alternatives. So to show my appreciation, I came up with a recipe that combined two of his favorites- a brat and a burger.
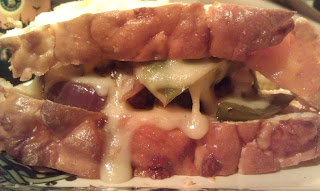
What You Need:
6 Pack of your Favorite Brats or Italian Sausages
1 Green Pepper
1 Small Onion (I used a Red Onion)
Swiss Cheese (4 Slices)
Buns (I used a Cheese Topped Bread I found at the Grocery)
*Makes 4 Burgers
Step 1: On a cutting board use a knife to cute the casing open on the brats. Remove the meat from the center of the casing and place in a large bowl. Continue to do this on all 6 brats.
Step 2: Once all the meat is in the bowl, mash it all together with a wooden spoon.
Step 3: Form 4 burgers with the meat and start grillin!
Step 4: As the burgers are grilling, cut up the green pepper and onion into slices. Place in a small skillet and saute until tender. These are for on top of burgers.
Step 5: Once the burgers are done, top with the peppers and onions and the swiss cheese and ENJOY!

These burgers were perfect with some Potato Salad and Corn on the Cob. Obviously, I just had the Potato Salad and Corn but Hubby sure appreciated some real meat for a change.
Hope you enjoy these!
Amber

What You Need:
6 Pack of your Favorite Brats or Italian Sausages
1 Green Pepper
1 Small Onion (I used a Red Onion)
Swiss Cheese (4 Slices)
Buns (I used a Cheese Topped Bread I found at the Grocery)
*Makes 4 Burgers
Step 1: On a cutting board use a knife to cute the casing open on the brats. Remove the meat from the center of the casing and place in a large bowl. Continue to do this on all 6 brats.
Step 2: Once all the meat is in the bowl, mash it all together with a wooden spoon.
Step 3: Form 4 burgers with the meat and start grillin!
Step 4: As the burgers are grilling, cut up the green pepper and onion into slices. Place in a small skillet and saute until tender. These are for on top of burgers.
Step 5: Once the burgers are done, top with the peppers and onions and the swiss cheese and ENJOY!

(Dinner on the back porch on an awesome summer night. Barley wants to know where his burger is.- haha)
These burgers were perfect with some Potato Salad and Corn on the Cob. Obviously, I just had the Potato Salad and Corn but Hubby sure appreciated some real meat for a change.
Hope you enjoy these!
Amber
Wednesday, August 8, 2012
Our Eclectic Lil Picture Collage
One of my favorite decorations in our house is on our living room wall. Its a collage of some of Nick and I's favorite pictures. Our decorating style is like rustic/ country/ eclectic style so the many different kinds of frames we included went perfect with the rest of the house.


I hope you love this idea as much as we do now that its done. It's a perfect way to tie a bunch of things you love into one adorable decorating idea. Happy decorating!!
Sunday, August 5, 2012
Recipe for Coffee Ice Cream Pie
Good Morning Readers! Well, its a rainy Sunday morning here in Columbus so its a perfect morning to relax with a hot cup of coffee (or 2) and blog. It was recently brought to my attention how long its been since I posted (thank you Tara for kicking me into gear) and I got really excited because the Hubby and I have been working like crazy on the house and trying to new recipes so there is PLENTY to post.
Our neighbors invited us over for dinner this past week and we were in charge of dessert. I've been obsessed with coffee ice cream lately so I decided to try a coffee ice cream pie and it was AMAZING. So, here's how I did it....
Coffee Ice Cream Pie
What you need:
1 package of Oreos
1 stick of butter
1 quart of Coffee Ice Cream
Fudge Ice Cream Topping
Caramel Ice Cream Topping
Whipped Cream
Non-stick Cooking Spray

Note: You can try this with any kind of ice cream, not just Coffee. I think I may try it with cookie dough ice cream next time.
Step 1: Take the ice cream out of the freezer so it can soften.
Step 2: (This is the best step if you've had a stressful day) Put the package of Oreos in a large ziplock bag and crush them until they are crumbs. You can use a rolling pin to get the crumbs fine enough.
If you have a food processor, just dump the cookies into it and let it do the work. Its SO much easier with the food processor (one of our many awesome wedding gifts).
Step 3: Melt the stick of butter and add to the cookies crumbs. If you are using a food processor, add the butter to the crumbs while they are still in the container and pulse in the melted butter. It mixes it together really well. If you are using a ziplock bag, put the crumbs in a bowl first and then stir in the butter.
Step 4: Spray the dish you will be using with the non-stick cooking spray. I used a pie pan. Make sure to get the corners and edges really well.
Step 5: Press the cookie crumb and butter mixture in the pan to make crust. Once the crust is made, place your pan into the fridge or freezer for a couple of minutes to allow the butter to harden back up.
Step 6: Scoop the ice cream into your crust. Use the back of a spoon or spatula to smooth out the top as much as possible.
Step 7: Dip a spoon into the fudge and caramel sauce and drizzle it over the top of the ice cream. Add as much as you like!
Step 8: Garnish with the whipped cream. I used an icing decorating gun to get the finished look on the whipped cream. If you don't have one, a dollop every so often on the top will work.
Step 9: Put back in the freezer for an hour or so before serving.

I hope you enjoy it as much as I did. And I promise, there will be more recipes and projects to come...
Our neighbors invited us over for dinner this past week and we were in charge of dessert. I've been obsessed with coffee ice cream lately so I decided to try a coffee ice cream pie and it was AMAZING. So, here's how I did it....
Coffee Ice Cream Pie
What you need:
1 package of Oreos
1 stick of butter
1 quart of Coffee Ice Cream
Fudge Ice Cream Topping
Caramel Ice Cream Topping
Whipped Cream
Non-stick Cooking Spray

Note: You can try this with any kind of ice cream, not just Coffee. I think I may try it with cookie dough ice cream next time.
Step 1: Take the ice cream out of the freezer so it can soften.
Step 2: (This is the best step if you've had a stressful day) Put the package of Oreos in a large ziplock bag and crush them until they are crumbs. You can use a rolling pin to get the crumbs fine enough.
If you have a food processor, just dump the cookies into it and let it do the work. Its SO much easier with the food processor (one of our many awesome wedding gifts).
Step 3: Melt the stick of butter and add to the cookies crumbs. If you are using a food processor, add the butter to the crumbs while they are still in the container and pulse in the melted butter. It mixes it together really well. If you are using a ziplock bag, put the crumbs in a bowl first and then stir in the butter.
Step 4: Spray the dish you will be using with the non-stick cooking spray. I used a pie pan. Make sure to get the corners and edges really well.
Step 5: Press the cookie crumb and butter mixture in the pan to make crust. Once the crust is made, place your pan into the fridge or freezer for a couple of minutes to allow the butter to harden back up.
Step 6: Scoop the ice cream into your crust. Use the back of a spoon or spatula to smooth out the top as much as possible.
Step 7: Dip a spoon into the fudge and caramel sauce and drizzle it over the top of the ice cream. Add as much as you like!
Step 8: Garnish with the whipped cream. I used an icing decorating gun to get the finished look on the whipped cream. If you don't have one, a dollop every so often on the top will work.
Step 9: Put back in the freezer for an hour or so before serving.

I hope you enjoy it as much as I did. And I promise, there will be more recipes and projects to come...
Sunday, March 4, 2012
Cork Boards for the Sewing Room
So this winter I've been working on a couple sewing projects. One of which was just getting my sewing room organized enough to be able to work on projects in it. I made two little ways to organize patterns I've picked up and all the spools of thread I've accumulated. Today, we're focusing on the cork boards because I LOVE them.

What you need for this project:
Corkboards
(I used a pack of three cork hot plates from Bed, Bath and Beyond $10)
Fabrics (I used three different)
Staple Gun
Hammer
Push Pins
3 tabs off a pop can

3 tabs off a pop can

Step 1: Cut a section of fabric big enough to cover your corkboard plus an extra 2 inches or so.


Step 2: Pull the fabric around to the back of the corkboard in small sections and secure with the staple gun.

Step 3: Continue pulling the fabric to the back of the corkboard. As needed, use the hammer to tap the staples in further.
Step 4: Trim any extra fabric from the back.

Step 5: Attach the pop can tabs to the back of the corkboard in the center. This will be what you use to actually hang the corkboard with. And you're done!
 |
Tuesday, January 3, 2012
Hollyberry Monogram "Wreath"
You asked for it...You're getting it. So many people asked me how to make our "H" wreath on our front door. It's so easy and really added a pop of color to your front porch. So here you go... I know its a little late for Christmas this year but it never hurts to start on projects for next Christmas!


Materials Needed:
Wooden Letter
Red Acrylic Paint
Sponge Paint Brush
Burlap Ribbon
Lots of Hollyberry Garnishes (I found mine at JoAnns)
Glue Gun
Glue Sticks
Optional: Staple Gun
Wreath Hanger (got at the Dollar Tree)


Optional: Staple Gun
Wreath Hanger (got at the Dollar Tree)
Step 1: Paint the wooden letter with the red acrylic paint.

Step 2: As the paint is drying, begin using the scissors (or wire cutters) to cut the berries of the stem.

Step 3: Once the paint dries, begin using the hot glue gun to glue the berries to the letter.

Step 4: Once the letter is completely covered in berries, its time to add your ribbon. This can be a little tricky depending on the letter. Letters Q, O, D, P, B etc. are a lot easier to hang than, for example, W. I used a staple gun to attach the ribbon to the left and right side of the H. You also use a hot glue gun to attach the ribbon. Or, if your has a letter with a full loop, just simply tie the ribbon through the letter.
Tip: I folded the ribbon over to create two layers on the ribbon so the stress from the weight of the wreath doesn't rip the ribbon. Depending on your letter, you may want to include this step.

Step 5: Hang it up and Enjoy!

Subscribe to:
Posts (Atom)